

Artisan Upholstery Studio has a YouTube Channel! Check it out!!
In the nineties, I worked at a custom furniture manufacturer. I upholstered sooooo maaaaany Parsons chairs that I almost shudder feel nostalgic when I see them now. Parsons dining chairs are fairly simple to re-upholster. (And unlike the 90s version, the legs are no longer upholstered, whew!) If you’ve got a bit of upholstery experience under your belt, and some basic upholstery tools, there’s no reason to be intimidated. Here’s how to re-upholster Parsons dining chairs if you want to be proud to say yeah, I did that myself!
 Any self-respecting upholstery DIYer will have on hand:
Enough fabric to cover your chairs (probably 1 1/2 to 2 meters/yards per chair).
Bonded polyester.
Cotton felt.
A staple gun – I use this one: https://amzn.to/3dnsJIC
A staple puller and pliers.
Cardboard strips.
A curved needle.
A rubber or plastic mallet.
Metal tack strips (optional).
Ornamental studs (optional).
A tack hammer (for studs).
The first order of business, obviously, is to strip the old fabric off. This job is much less frustrating with the proper tools. Work gloves help if you haven’t already got rough callused hands.
 The first thing that I notice about these chairs is how flat the seat is. A well-upholstered dining chair should have a nice, round look to the seat, called “the crown”. A flat seat will look cheap, so if you’re looking for a custom, luxurious look, this is an important step! On the left, you can see the crown on the finished seat.
 The crown is achieved by adding a layer of cotton felt to the middle section of the seat, and then a full layer of bonded polyester pulled and stapled at the bottom edge of the chair, just as you would the fabric.

Next comes the seat fabric. Make sure you cut the piece large enough to fully wrap around the edges, including at the back. Lay your fabric out on the seat, centering it. Staple the sides first temporarily. You should be pulling it fairly tight across the center and place one staple at the bottom edge at the center of the chair rail.

Do both sides. Next, do the same to the front. For the back, you’ll need to make some cuts. Fold the fabric back and make a “v-cut”, just to where the leg post is. Essentially, the v-cut allows the fabric to fold easily on either side of the leg post, with no excess fabric. If you feel it with your fingers, you’ll know what I’m talking about. Cut down the center line toward the post, and then make your v to each side of the post, as close as you possibly can.
 Do both sides. Now you’ll be able to pull the fabric through to the back rail.
 I like to begin at the back, when tacking down the fabric. Pull tight, but not tight enough to cause tension at the front of the chair. Next, take out one of the side staples and pull the fabric toward the back of the chair, not straight down. Staple toward the back leg, and work your way toward the front leg, pull the fabric forward as you go.
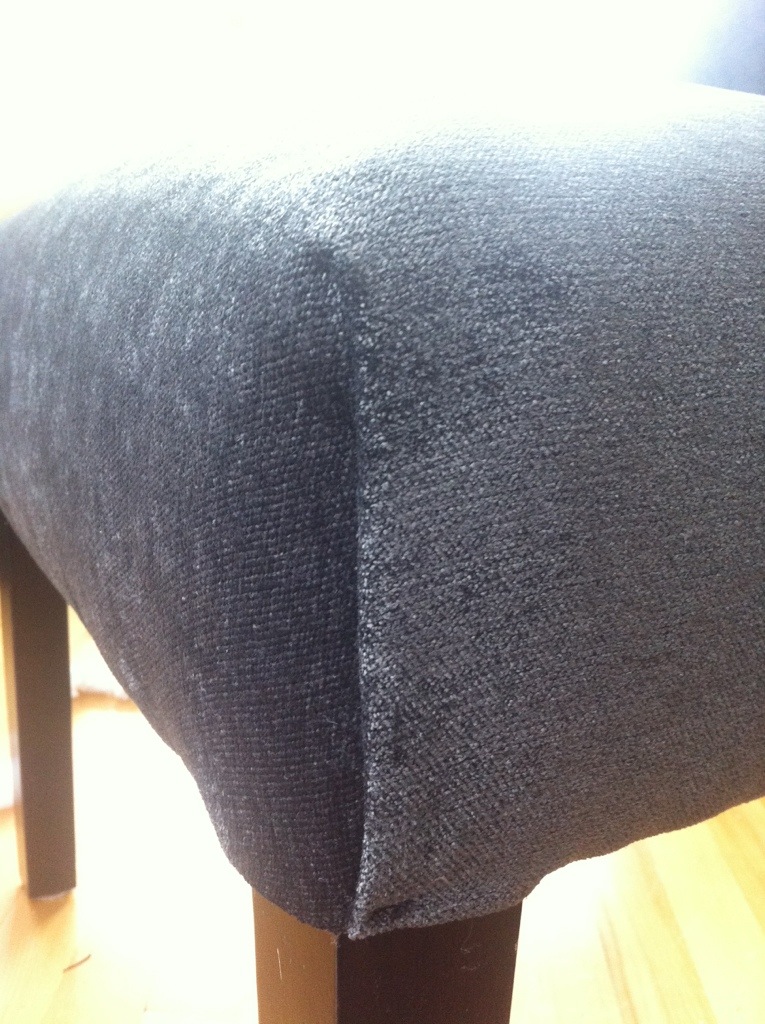
 You want a nice, gentle curve without bulges. Do the other side. To finish the legs, make cuts on an angle and fold under. This is important to ensure that the cut edge will be hidden.

 The front corners are important to get right. You’re going to have long pleats, and they must be identical. Pulling the fabric taut at the side first, staple on the front face edge, like so:
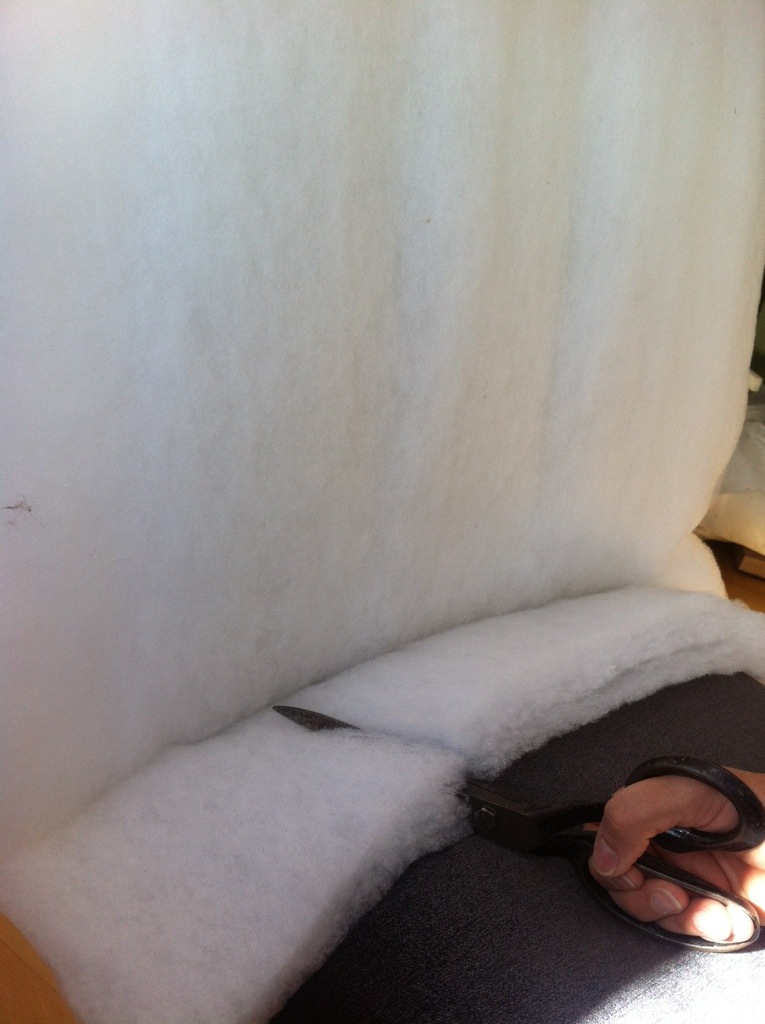
 Then, you want to cut away the excess fabric, like so:

 Fold the fabric under nicely and staple on the front. (The staple will be visible, but hidden with studs, later.)
 Now you’re ready to do the back. First add the bonded polyester.
 Wrap around and staple close to the edge. It should be tight, and not bulky.
 Lay your fabric on, and tack it in place at the top with one staple. Find the leg support rail and make a “V-cut”. V-cuts also take any tension out of the fabric, which can cause puckers and other unsightly bulges. Pull the fabric through the back.
 Cut away the excess fabric before tacking in place. Do both sides. Next, pull the fabric tightly upward, and staple at the top to hold it in place.
 Once both sides are tacked in place, you can go back and place all your staples. You want taut fabric, with no puckers.
 Now you are going to make your nice, neat pleats at the top corners.
 Pull tight, cut away excess fabric, pull over and tack down. Did I mention you need to pull tight? Now you can tack along the top edge. No puckers! *smacking your hand with my ruler for emphasis* This is the most visible part of the chair!

Ready for more? Next comes the outside back panel.
 You’re going to tack it at the top with a bit of cardboard strip. This gives a straight, sharp edge.
 Pad the back with a bit of foam or more bonded poly. Fold the fabric down and tack it down at the bottom with one staple. If you have metal tack strips, your job of folding and tacking the sides will be quick and easy. If you don’t have them, you can blind stitch the sides in place.

 Poke the sharp teeth through your fabric and fold over. Hammer the tack strips down with a plastic mallet.
 Finish your chair by folding the fabric at the legs, and tacking it down. You can add decorative studs to cover the staples or hand stitch the corner and remove the staple.
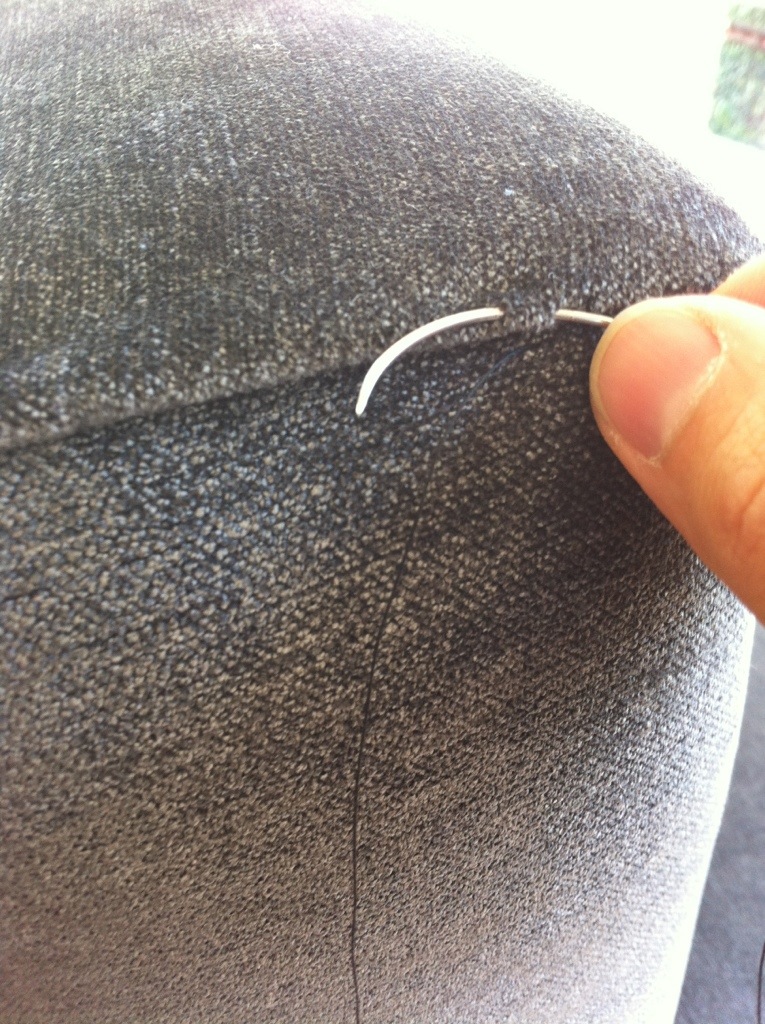
Hand stitching where necessary is an important detail to make your chair look professional. Blind stitch all long pleats (like at the front), and anywhere that looks loose (such as at the top back corners).
 Don’t forget your dust cover!
 So, your Parsons chair is finished! How do you feel? A sense of accomplishment and self satisfaction? Pride? Sore hands, frustration?


I have added studs along the bottom edge of these chairs. Click here for that post. Once you have mastered an armless Parsons chair, be sure to check out my slightly more complicated Side Chair Tutorial.
*I fully endorse the tools listed here, and am eligible to make a small commission if you use my links to make a purchase from Amazon.
